Category Archives: Blog

A Very Long Hiatus

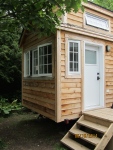
I have been gone for a very long time.  Much has happened since my last post.  My world has changed and grown and I am in a place where I wasn’t confident I would get to.  I avoided talking about where my health was when I was blogging though the process of designing and building Tiny Refuge, and at the time I wasn’t ready.  But I just gave a TEDx talk about how I came to design and build my home, so I figure it’s time for me to share that here.

My last post was almost 2 years ago.  I haven’t written since then because I was still very much recovering from a burnout and I needed space and time from the build. Right, the burnout.  I will write a separate post about what brought me to build my home and I will share with you what my journey was like.  Presently, I am writing because I had a most amazing day and it ended a gift of connection that I feel truly blessed to have shared with another human being.  In fact, I have been blessed with two such moments in the past 6 weeks, but perhaps that is a story for another time.

In mid November, I was contacted by a woman who is an engineering student at HEC, part of the Université de Montréal.  She approached me to be a candidate for the planned TEDx conference scheduled for April 2nd.  We met for coffee in the back room of a cafe in Côte-des-Neiges (a neighbourhood in Montreal) and we spent an hour or two talking, sharing and listening to each other. We discussed what my talk might be about, the recent bombings in Paris and what it means to be a friend.  It was a beautiful encounter.  I left our first meeting feeling honoured to have been asked and excited at the prospect of a TEDx talk, though there was no guarantee that I would be chosen as one of the speakers.

We next met in early February.  I found out that I had been selected as a speaker and that I would have 12-18 minutes to speak.  There would be a rehearsal in early March, and then the conference would be as scheduled in April.  When I read the description of what it is to be a TEDx speaker, I almost called her and dropped out.  What could I possibly share that would be original?  I am no researcher, I am not an expert, I am simply a woman who built a tiny house.  After a gentle nudge or two, I trusted that I would not have been selected if I did not have something worthwhile sharing.

The rehearsal in March came and went, and today I was part of a TEDx conference.  I spoke after an astrophysicist and before an Al Gore TED speech from January 2016.  It felt a little like I was speaking between giants. My talk went well.  I made my way through my talk with some grace and when I was flummoxed, I dealt with it and moved on.  I am still reeling from the fact that I gave a TEDx talk.  But the giving of the talk was just part of an amazing day.  I met a lawyer who studies non-verbal communication and is working at dispelling some of the myths about non-verbal communication and its role in the legal system.  I met a man who sailed across the Atlantic and trekked across uncharted territory in the Antarctic. I shared nervous energy with a cancer survivor who now speaks in schools across Québec and Ontario about bullying.  I stood beside a man who has created an emergency response technology that will help aide professionals more rapidly assess and respond to disasters across the world.  I am humbled and honoured to have shared the stage with so many inspirational and amazing people.  I have not mentioned them all, I don’t think I can do them all justice.

After the long day of talks, there was a reception where the audience members, the organizers and the speakers came together and got a chance to talk, debrief and integrate what was a fascinating day of ideas.  I got to meet and speak with amazing and open people.  I got to talk about tiny houses, discovering ones path and how to follow it, feminism, the degrowth movement, art, music, spirituality and more.

The day ended with a request that prompted this blog and I think a return to blogging.  I may not continue on this particular blog or if I do I will also start another.  I may simply be a woman who has built her own tiny house, I am also a woman with a voice that has something to say and who is ready to be heard.

Looks Like Home

Overdue for an Update

I have started moving in!  I have been sleeping in the tiny house since my mattress was delivered at the beginning of the month.  It has been glorious to wake up in my loft, hearing the birds outside and feeling so very much at home!  The bathroom isn’t finished yet, there is no electricity and the propane hasn’t been installed yet, up until yesterday there was nothing to sit on and the floors were covered up with cardboard.

Here’s a recap of the work that has been done in the month since my last update:

The bathtub has been built!  The drain was installed, but leaked, so we had to head back to the drawing board and after some consultation and a new drain basket, fingers crossed, I will have a functional tub at the beginning of June.    Here are the tub progress pics.

The toilet bench has also been built.  The final coat of paint is drying as I type this.  The toilet bench also accommodates the winter grey water tank and the fancy grey water plumbing.  I have to attach the piano hinge for the two lids on the bench (one for the toilet and the other for the grey water compartment).  The sawdust will live in a bin that will rest on the grey water compartment.  The toilet will be ready early next week.

The kitchen counter has been installed!  I am really happy with the counter I chose and with the amount of counter there is in the tiny house.  The kitchen sink and faucet were installed and the freshwater plumbing is almost finished, with the exception of the countertop water inlet connection.  As it’s spring, I am all hooked with a potable water hose and I have running water.  The exterior grey water tank or french drain still has to be worked out, but as I am not living in the house full-time yet, it hasn’t been a problem yet.

The HRV units got their boxes, which we filled with spray foam, and then they were finished.  I am really happy with how the HRV units look and I get a bonus space above them to sneak in a knick-knack if the fancy strikes me.

Left to do (nb: this is not an ordered list)

  • Get a welder to come out and weld on the brackets for the propane tanks.
  • Get propane installed.
  • Install the stove and the furnace.
  • Finish the freshwater plumbing.
  • Install the drain and faucet on the tub.
  • Install the lids on the toilet bench.
  • Install ¼” plywood on the front edges of the rafters for the roofers.
  • Get a new roof.
  • Figure out my clothing storage.
  • Install the last of the trim in the bathroom.
  • Install the medicine cabinet in the bathroom.
  • Have a house-warming party!

Plumbing

The tiny house is moving forward in leaps and bounds, and then something comes up that stalls everything for a bit and then the build moves forward in a different direction until something comes up that has to be creatively encountered.    The plumbing demands of the house have certainly caused a few minor stalls, creative problem solving and multiple trips to the hardware store.

There are conversations in the tiny house community about the cost of a tiny house per square foot vs the cost of a traditional home.  I have strong opinions about that and won’t get into them now, but I will say that in a tiny house, particularly one in this climate, you have to fit in a lot of the same elements as a traditional home in a much smaller space and then fit in some things you would have to think about let alone find space for.

I started figuring out my plumbing needs and purchasing the big elements of my plumbing several months ago.  My plumbing system allows for pressurized water supply from a hose and also a supply via a  26 gallon fresh water tank under my kitchen sink.  The pressurized water is pretty straightforward – the water comes in and goes either directly to supply the taps of the kitchen sink, bathroom sink or bathtub with the normal bypass to the hot water heater OR it can fill the fresh water tank.  The fresh water tank can be filled 3 ways: (1) the pressurized supply that comes in through an RV water inlet that has a hose connection and  (2) a poured water supply line, (3) poured in through a marine water inlet in the counter.  Once the fresh water tank is filled, there is a water pump that draws water from the tank to supply cold water directly to the taps or to the hot water heater to supply hot water to the taps.    The reasons for the fresh water tank and the multiple ways of  filling it are weather related.  At -30 celsius, there is no guarantee that even the best heated potable water hose will be able to supply water to the house, and at the same time I want to be able to fill the water tank from inside – getting water into a small hole at chest height at -30 is not my idea of fun.

Once the supply aspect of the fresh water system was worked out and plumbed, the rest of the fresh water went really quickly.  The fresh water plumbing is done with pex and clear vinyl tubing (for filling the fresh water tank through the exterior and interior inlets).

The grey water has had its challenges as well.  The grey water from the bathtub, the kitchen and bathroom sinks all goes out of the house at the same spot under the tub.  The grey water will leave the house and go into a storage tank or a french drain will have to be set up, depending on the location of the house.  That system will work well until the weather goes below freezing.  I have no desire to chance what will happen in a grey water outlet or tank once the water in it freezes and expands.  Visions of cold hours under my trailer at -30  are also not my idea of fun.  The original plan was to have buckets under the sinks and to shower elsewhere in winter, both of which I am fine with.   Unfortunately, fitting a fresh water tank, a pump and a water heater under a counter does not leave any space for a bucket.

Here is the solution:  the grey water from the kitchen goes past the bathtub, joins up with the grey water from the bathroom sink and then heads to a valve that either sends it towards the tubs grey water and out of the house or to a grey water container inside the bathroom.  Putting the solution in place called for some creative plumbing and pieces.  I am still on the hunt for a 5-6 gallon  grey water tank that I will be able to remove from its spot in the bathroom and empty in a suitable location.

Building Bonanza Update: Kitchen Installation

It has been a full week of building.  The kitchen cabinets are in, the plumbing has been started and is almost complete inside the house, another order of lumber was done  for the bathroom siding, the ceiling under the loft and the remainder of the trim; the bathtub has been built and the fiberglass tub is ⅔ complete.

The kitchen cabinets went in beautifully.  It was a bit of a tight squeeze in some spots, the wheel well boxes had to be shaved down in size and there are shims in places I didn’t even know one would put shims.  The kitchen looks great. I was concerned that the house would feel smaller once the kitchen was in, but it doesn’t.  I wanted to be sure that there was a good amount of storage and counter space in the kitchen, but that there is also enough space between the counters so that two people can work in the kitchen and so that someone can still get to the bathroom if someone is cooking.  Mission accomplished!  There is just about 3′ of space between the kitchen cabinets and the comfort of that space has been tested thoroughly as construction continues.  It’s a great spot to work out the next challenge.  I can feel the kitchen parties happening already.

A word about my countertop. I have decided to go with a butcher block countertop.  Not the best choice weight wise, but a good choice as far as handling the stresses of the road.  We took a field trip after my last post to visit  a countertop supplier in Montreal.  They had gorgeous options in all things countertop.   They came in at twice to almost three times the price of Ikea for a solid wood butcher block counter.   To see the Ikea countertop, I had to buy the countertop sight unseen with the exception of well-worn sample in the kitchen department.  Another field trip to Ikea.  After watching the stock for the countertops  for a week, they were finally in stock on Good Friday.  So off we went to find the store packed.  We navigated through the maze of the showroom using as many shortcuts as possible to stand in a considerable line and wait to order the countertop. Once ordered, another journey to navigate through the rest of the showroom and then down to the stock floor and navigate out of the small items stock into the large item stock room to wait in a longer line to pay for the countertops.  Then to the returns/merchandise pick up counter, where I took a number, with only 41 people ahead of me to find out that I didn’t need to pick a number, just stand and wait in front of a large screen to watch my order travel through three columns of received, being prepared, and completed.  Fortunately, my order was automatically put in the queue when I paid and equally fortunate, I got another number about halfway through my first wait of 41 people, in case I had to return the countertops.  I got the countertops and decided to return them, despite the long wait to see them.  The joinery in the butcher block made for weak point that would be problematic in the road.  There was a wooden table like the countertop  in the As-Is department that was bowed out of shape.  I highly recommend staying away from Ikea on a holiday or weekend if at all possible, unless you enjoy long lines and lots of waiting.

Flooring Part II

Progress on Tiny Refuge is just chugging along.  Tiny Refuge now has flooring!  Yesterday morning, we installed the cork flooring in the lofts and started on the porcelain tiles in the kitchen and great room and today we finished tiling the kitchen and great room.

Tomorrow, the grout goes on and then a field trip to a counter supplier!


Sanding And Then More Sanding

It has been two weeks since Tiny Refuge has been under full-time construction.  During the first couple of weeks, most of the work done was mostly at Stefan’s shop as he built the kitchen cabinets out of the leftover interior siding or panelling.  There was just enough wood to build the cabinets out of, it was very tight, it took every single plank left to build the cabinets.  It was a labour intensive process, Stefan cut and planed down each board, glued them together, cut them again to size, built doors, drawers and cabinets.  I helped out with sanding and applying wood filler where necessary on each piece that Stefan built and then sanding them again.  Once everything was sanded, we started painting the cabinets.  I bought white milk paint for the cabinets and they are finished with hemp oil.

As he was working in the shop, the interior siding was sanded to get it ready to have SafeCoat Clear applied to it.  SafeCoat Clear is a fire retardant.  It is used in the film industry and in industrial applications on wood.  If my walls were drywall or  solid sheets of plywood instead of panelling, or if I had used rock wool or sheep wool insulation, they would meet code for fire safety without adding a fire retardant.  On the plus side, it has no VOCs and it’s a Canadian product.

When I wasn’t sanding my kitchen cabinets at the shop, I was sanding the walls of the tiny house.  Alex and my mom helped out with sanding the chamfered edges each of the panels of the interior siding.  It was a full day of sanding after several days of sanding before that.  It was a long but well worthwhile process.  The walls look great.  After they were completely sanded, wiped down and the tiny house thoroughly vacuumed, Stefan came over and applied a sealant to the walls with .  Once the sealant dried, we very lightly sanded the walls again and then started applying the first coat of fire retardant.  SafeCoat Clear has to be mixed on site, and we half of it as that’s what we needed for the first coat.  That was unwise. Once mixed, the SafeCoat clear only has a 2-3 hour pot life.  As it gets closer to the end of its pot life, it gets thicker and stickier.  By the time we were applying the SafeCoat Clear to the last section of the tiny house, it was tough going.

The second coat went on much better.  The walls look so much richer after the sealant and fire retardant.